Ansible部署Nginx/Tomcat高可用+Maven私服生成Web项目

Ansible部署Tomcat/Nginx高可用+Maven私服生成Web项目
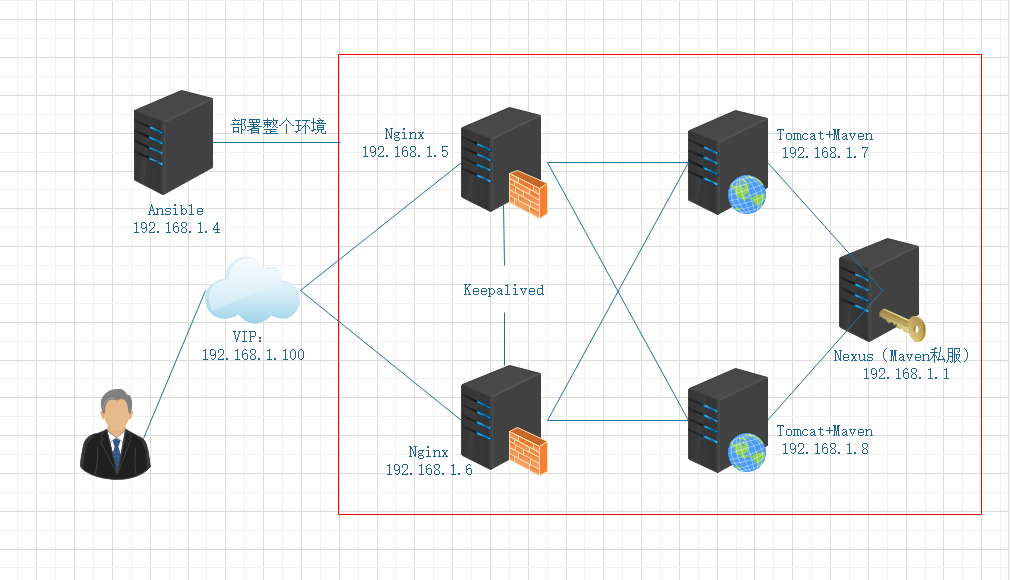
实验环境
环境中需要用到互联网,推荐每台都使用外网
Ansible4:192.168.1.4
Nginx+Keepalived5:192.168.1.5 VIP:192.168.1.100
Nginx+Keepalived6:192.168.1.6 VIP:192.168.1.100
Tomcat+Maven7:192.168.1.7
Tomcat+Maven8:192.168.1.8
Nexus:192.168.1.1(Maven仓库私服使用现成的)
验证Client使用宿主机即可
实验目的
使用Ansible部署所有环境,使用Nginx反向代理后端两台Tomcat,Keepalived用来对两台Nginx进行双机热备,并达到最后Client访问Keepalived的漂移ip(VIP)可以获取后端两台Tomcat的不同页面,而Tomcat的页面是由Maven来完成的Web项目,Maven使用Nexus私服来进行生成Web应用的war包
在Ansible服务器准备模板文件
Keepalived配置文件模板文件
vim keepalived.conf.j2
! Configuration File for keepalived

global_defs {
   notification_email {
     acassen@firewall.loc
     failover@firewall.loc
     sysadmin@firewall.loc
   }
   notification_email_from Alexandre.Cassen@firewall.loc
   smtp_server 192.168.200.1
   smtp_connect_timeout 30
   router_id LVS_DEVEL
}

vrrp_instance VI_1 {
    state {{state}}
    interface ens33
    virtual_router_id 51
    priority {{level}}
    advert_int 1
    authentication {
        auth_type PASS
        auth_pass 1111
    }
    virtual_ipaddress {
        192.168.1.100
    }
}
virtual_server 192.168.1.100:80 {
    delay_loop 6
    lb_algo rr
    lb_kind DR
    nat_mask 255.255.255.0
    persistence_timeout 0
    protocol TCP
    real_server 192.168.1.7:8080 {
        weight 1
            connect_port 8080
            connect_timeout 3
            nb_get_retry 3
            delay_before_retry 3
    }
        real_server 192.168.1.8:8080 {
        weight 1
            connect_port 8080
            connect_timeout 3
            nb_get_retry 3
            delay_before_retry 3
    }
}
Nginx脚本文件
vim nginx    # 编写脚本文件
#!/bin/bash
#chkconfig:- 99 20
#description:Nginx Service Control Script
PROG="/usr/local/nginx/sbin/nginx"
PIDF="/usr/local/nginx/logs/nginx.pid"
case "$1" in
        start)
        $PROG
;;
        stop)
        kill -s QUIT $(cat $PIDF)
;;
        restart)
        $0 stop
        $0 start
;;
        reload)
        kill -s HUP $(cat $PIDF)
;;
        *)
        echo "Usage: $0 {start|stop|restart|reload}"
        exit 1
esac
exit 0
编写一个Tomcat页面文件模板
vim index.jsp.j2
Tomcat {{ip}}
实验步骤
Ansible(192.168.1.4)
安装Ansible
# 解决依赖关系
yum -y install epel-release
# 安装ansible
yum -y install ansible
设置Ansible对部署环境主机的免密登录
ssh-keygen     # 只需要几次回车即可
ssh-copy-id -i .ssh/id_rsa.pub root@192.168.1.5
ssh-copy-id -i .ssh/id_rsa.pub root@192.168.1.6
ssh-copy-id -i .ssh/id_rsa.pub root@192.168.1.7
ssh-copy-id -i .ssh/id_rsa.pub root@192.168.1.8
添加Ansible的控制端主机列表
vim /etc/ansible/hosts
# 文件末尾添加
[nginx]   # 用来部署Nginx+Keepalived
192.168.1.5 state=MASTER level=100
192.168.1.6 state=BACKUP level=99

[tomcat]   # 用来部署Tomcat+Maven
192.168.1.7 ip=1.7
192.168.1.8 ip=1.8
编写Tomcat安装剧本
在Ansible拖包: Java/Nginx/Tomcat/Keepalived/Maven
vim Tomcat_Mvn_Nginx_Keepalived.yml
- hosts: tomcat
  remote_user: root
  tasks:
    - name: tar jdk
      unarchive: src=/root/jdk-8u201-linux-x64.tar.gz dest=/usr/local/
    - name: mv jkd
      shell: mv /usr/local/jdk1.8.0_201 /usr/local/java
    - name: set jdk PATH
      lineinfile: path=/etc/bashrc insertbefore=EOF line="export JAVA_HOME=/usr/local/java\nexport JRE_HOME=/usr/local/java/jre\nexport CLASSPATH=$JAVA_HOME/lib:$JRE_HOME/lib\nexport PATH=$PATH:$JAVA_HOME/bin:$JRE_HOME/bin"
    - name: delete old_java
      shell: path=/usr/bin/java state=absent
    - name: source
      shell: source /etc/bashrc

    - name: tar tomcat
      unarchive: src=/root/apache-tomcat-8.5.35.tar.gz dest=/usr/local
    - name: mv tomcat
      shell: mv /usr/local/apache-tomcat-8.5.35 /usr/local/tomcat
    - name: tar Maven
      unarchive: src=/root/apache-maven-3.6.0-bin.tar.gz dest=/usr/local
    - name: mv Maven
      shell: mv /usr/local/apache-maven-3.6.0 /usr/local/maven
    - name: soft mvn links
      file: src=/usr/local/maven/bin/mvn dest=/usr/bin/mvn state=link
    - name: set Private server
      lineinfile: path=/usr/local/maven/conf/settings.xml insertbefore="</mirrors>" line="  <mirror>\n    <id>nexus conf</id>\n    <name>nexusconf</name>\n    <url>http://192.168.1.1:8081/repository/maven-public/</url>\n    <mirrorOf>*</mirrorOf>\n  </mirror>"
    - name: create projects
      shell: mvn archetype:generate -DgroupId=cn.cyj.pjf -DartifactId=pjf -DarchetypeArtifactId=maven-archetype-webapp -DinteractiveMode=false
    - name: create page
      shell: mvn test
      args:
        chdir: /root/pjf/
    - name: generate war package
      shell: mvn package
      args:
        chdir: /root/pjf/
    - name: deploy tomcat
      copy: src=/root/pjf/target/pjf.war dest=/usr/local/tomcat/webapps/ remote_src=yes
    - name: create web directroy
      file: path=/usr/local/tomcat/webapps/pjf state=directory
    - name: unzip war package
      unarchive: src=/usr/local/tomcat/webapps/pjf.war dest=/usr/local/tomcat/webapps/pjf remote_src=yes
    - name: set root directory
      lineinfile: path=/usr/local/tomcat/conf/server.xml insertbefore="      </Host>" line="        <Context path="" docBase="/usr/local/tomcat/webapps/pjf" reloadable="false" crossContext="true"/>"
    - name: start tomcat
      shell: nohup /usr/local/tomcat/bin/startup.sh &
    - name: alter page
      template: src=/root/index.jsp.j2 dest=/usr/local/tomcat/webapps/pjf/index.jsp
    - name: firewall 8080
      shell: firewall-cmd --add-port=8080/tcp --permanent
    - name: relaod
      service: name=firewalld state=reloaded

- hosts: nginx
  remote_user: root
  tasks:
    - name: install nginx
      unarchive: src=/root/nginx-1.11.1.tar.gz dest=/usr/src
    - name: yum install pcre* openssl*
      yum: name=pcre-devel,openssl-devel,gcc,gcc-c++,zlib-devel
    - name: make install nginx
      shell: ./configure --prefix=/usr/local/nginx --user=nginx --group=nginx --with-http_stub_status_module --with-pcre && make && make install
      args:
        chdir: /usr/src/nginx-1.11.1
    - name: lnfile
      file: src=/usr/local/nginx/sbin/nginx dest=/usr/local/sbin/nginx state=link
    - name: create nginx user
      user: name=nginx create_home=no shell=/sbin/nologin state=present
    - name: nginx start script
      copy: src=/root/nginx dest=/etc/init.d/nginx
    - name: xp
      file: path=/etc/init.d/nginx mode=0755
    - name: add system service
      shell: chkconfig --add nginx
    - name: open system auto started
      shell: systemctl enable nginx
    - name: start nginx
      service: name=nginx state=started
    - name: lineinfile upstream
      lineinfile: path=/usr/local/nginx/conf/nginx.conf insertbefore='    server {' line='    upstream tomcatpools {\n        server 192.168.1.7:8080 weight=1;\n        server 192.168.1.8:8080 weight=1;\n        }'
    - name: view nginx configfile
      lineinfile: path=/usr/local/nginx/conf/nginx.conf insertafter='            index  index.html index.htm;' line='            proxy_pass  http://tomcatpools;'
    - name: restart nginx
      service: name=nginx state=restarted
    - name: firewall
      shell: firewall-cmd --add-port=80/tcp --permanent
    - name: reload firewalld
      service: name=firewalld state=reloaded

    - name: install keepalived
      yum: name=popt-devel,kernel-devel,openssl-devel
    - name: tar keepalived
      unarchive: src=/root/keepalived-1.2.13.tar.gz dest=/usr/src
    - name: make keepalived
      shell: ./configure --prefix=/ --with-kernel-dir=/usr/src/kernel && make && make install
      args:
        chdir: /usr/src/keepalived-1.2.13
    - name: view ARP
      lineinfile: path=/etc/sysctl.conf insertbefore=EOF line='net.ipv4.conf.lo.arp_ignore = 1\nnet.ipv4.conf.all.arp_ignore = 1\nnet.ipv4.conf.default.arp_ignore = 1\nnet.ipv4.conf.lo.arp_announce = 2\nnet.ipv4.conf.all.arp_announce = 2\nnet.ipv4.conf.default.arp_announce = 2'
    - name: success ARP
      shell: sysctl -p
    - name: template
      template: src=/root/keepalived.conf.j2 dest=/etc/keepalived/keepalived.conf
    - name: chkconfig
      shell: chkconfig --add keepalived && chkconfig keepalived on
    - name: start keepalived
      service: name=keepalived state=started
验证:任意服务器或者可以ping通的客户机
curl 192.168.1.100
Tomcat 1.7
curl 192.168.1.100
Tomcat 1.8博客内容遵循 署名-非商业性使用-相同方式共享 4.0 国际 (CC BY-NC-SA 4.0) 协议