Nginx反向代理及负载均衡调优

Nginx反向代理的实现
nginx通过反向代理实现负载均衡需要两个模块:(默认在安装时已经添加)
ngx_http_proxy_module  # 代理模块
ngx_http_upstream_module    # 负载均衡模块

upstream www_server_pools {        # 开启负载均衡功能,命名为www_server_pools
      server 192.168.1.4 weight=1;        # 后端节点ip1
      server 192.168.1.5 weight=1;        # 后端节点ip2
        }
轮询方式(调度算法)
分为静态和动态算法
静态:负载均衡服务器根据规则进行分配(普通轮询,加权轮询,ip_hash,url_hash)
动态:负载均衡服务器根据后端节点状态进行分配
1、平均分配(默认情况)
每个请求按照时间顺序同一分配到不同的服务器
upstream 名字 {
    server ip;
    server ip;
    }
2、加权轮询
指定轮询几率,weight权重和访问率成正比
upstream 名字 {
    server ip weight=8;
    server ip weight=10;
    }
3、ip绑定Ip_hash
每个请求按照访问ip的hash结果分配
保证每个访客可以访问固定的后端服务器
upstream 名字 {
    ip_hash;
    server ip;
    server ip;
    }
4、fair(第三方)
按照服务器响应时间分配,响应迅速的优先分配
upstream 名字 {
    server ip;
    server ip;
    fair;
    }
5、URL_hash(第三方的模块包)
根据URL的hash结果分配请求,将固定的url分配给同一个服务器
upstream 名字 {
    URL_hash;
    server ip;
    server ip;
    }
upstream选项
server [option]
option:
weight     加权轮询
down    表示服务器永远不可用
backup    表示服务器作为备用服务器
max_fails=1    尝试连接后端服务器失败的次数
fail_timeout=60s    连接后端服务器失败进行重试的间隔秒数
如: server ip weight=1;
    server ip down;
    server ip backup;
    ...
配置访问认证
auth_basic string/off;        //开启用户密码后者关闭密码
auth_basic_user_file;        //用户密码存放路径
# 生成用户密码
htpasswd -bc /usr/local/nginx/conf/htpasswd gods 123.com
-b 生成 -c 创建
在上述目录下生成一个用户叫gods 密码为123.com的名字叫做htpasswd的文件
日志级别
7个,级别由低到高级别越高,记录的内容越少:
debug
info
notice
warn //常用,记录警告信息
error //常用,记录错误信息
crit
alert
emerg
日志切割脚本
[root@localhost ~]# vim /usr/local/nginx/logs/cut_log.sh
#!/bin/bash
Dateformat=`date +%Y%m%d`
Basedir="/usr/local/nginx"
NginxLogdir="$Basedir/logs"
Logname="access"
[ -d $NginxLogdir ] && cd $NginxLogdir || exit 1
[ -f ${Logname}.log ] || exit 1
/bin/mv ${Logname}.log ${Dateformat}_${Logname}.log
$Basedir/sbin/nginx -s reload
[root@localhost ~]# chmod +x /usr/local/nginx/logs/cut_log.sh
rewrite 跳转/重定向
在server中添加跳转模块,可以让访问直接跳转到指定页面
REGEXP
^ 匹配输入字符串的开始位置
$ 匹配输入字符串的结束位置
- 匹配*前面的字符串0次或者多次
- 匹配+前面的字符一次或者多次
?匹配?前面的字符0次或者一次
permanent 返回301永久重定向
redirect 返回302临时重定向,浏览器显示跳转后的URL地址
location
根据用户请求的URI执行不同的应用(URI本地地址)
隐藏报错页面的nginx版本号
Nginx负载均衡实验
实验环境:
nginx负载均衡:192.168.1.1
nginx后端web:192.168.1.4/192.168.1.5
client:192.168.1.6
nginx都是已经搭建好的,没有搭建的参考之前的文档

实验目的:
用户只需要访问负载均衡服务器即可根据轮询算法得到后端不同服务器之间的数据
实验步骤:
第一步:
配置nginx负载均衡服务器:192.168.1.1
[root@localhost ~]# vim /usr/local/nginx/conf/nginx.conf
在http模块中添加负载均衡模块:
    upstream www_server_pools {
        server 192.168.1.4 weight=1;        //后端节点ip1
        server 192.168.1.5 weight=1;        //后端节点ip2
        }
更改server模块(真实环境只需要一个即可):
    server {
        listen          80;
        server_name     192.168.1.1;
    location / {
        root               html;
        index           index.html index.htm;
         proxy_pass      http://www_server_pools;
               }
           }

[root@localhost ~]# systemctl restart nginx
第二步:
配置后端web节点的页面
192.168.1.4
[root@localhost ~]# vim /usr/local/nginx/html/index.html     //两台后端为了验证试验效果,分别写入不同的页面
添加
192.168.1.4
192.168.1.5
[root@localhost ~]# vim /usr/local/nginx/html/index.html     //两台后端为了验证试验效果,分别写入不同的页面
添加
192.168.1.5
第三步:
验证:
使用client:192.168.1.6
直接访问nginx负载均衡即可:192.168.1.1
[root@localhost ~]# curl 192.168.1.1
192.168.1.4
[root@localhost ~]# curl 192.168.1.1
192.168.1.5
配置认证访问
修改nginx负载均衡的配置文件:192.168.1.1
[root@localhost ~]# vim /usr/local/nginx/conf/nginx.conf
    server {
        listen          80;
        server_name     localhost;
    location / {
        root            html;
        index           index.html index.htm;
        auth_basic      'guess the password';  # 提示信息
        auth_basic_user_file    /usr/local/nginx/conf/htpasswd;   # 用户密码存放路径
        proxy_pass      http://www_server_pools;
               }
           }
安装httpd,使用htpasswd命令生成用户密码文件
[root@localhost ~]# htpasswd -bc /usr/local/nginx/conf/htpasswd mupei 123.com
[root@localhost ~]# chmod 400 /usr/local/nginx/conf/htpasswd
[root@localhost ~]# chown nginx /usr/local/nginx/conf/htpasswd
简单优化nginx
切割日志
编写日志切割脚本,并创建计划任务,定期切割
[root@localhost ~]# vim /usr/local/nginx/logs/cut_log.sh
#!/bin/bash
Dateformat=`date +%Y%m%d`
Basedir="/usr/local/nginx"
NginxLogdir="$Basedir/logs"
Logname="access"
[ -d $NginxLogdir ] && cd $NginxLogdir || exit 1
[ -f ${Logname}.log ] || exit 1
/bin/mv ${Logname}.log ${Dateformat}_${Logname}.log
$Basedir/sbin/nginx -s reload

[root@localhost ~]# chmod +x /usr/local/nginx/logs/cut_log.sh
[root@localhost ~]# crontab -e        //创建计划任务
00 00 * * * /usr/local/nginx/logs/cut_log.sh        //每天00时运行脚本
[root@localhost ~]# crontab -l        //查看计划任务
rewrite:URL跳转
[root@localhost ~]# vim /usr/local/nginx/conf/nginx.conf
在server模块中添加
    server {
        listen          80;
        server_name     localhost;
rewrite ^/(.*) http://www.haha.com:81/$1 permanent; # 跳转到的页面以上配置表示如果访问www.haha.com:81会跳转到192.168.1.1,只要访问www.haha.com:81时的页面需要输入密码则跳转成功
限制用户访问内容
[root@localhost ~]# vim /usr/local/nginx/conf/nginx.conf
    server {
        listen          80;
        server_name     www.haha.com;
        root            /var/www/html;
    location / {        //表示请求网页根目录下的html文件,返回401状态码
        return 401;
        }
    location = / {        //表示请求网页根目录,返回402状态码
        return 402;
        }
    location /documents/ {        //表示请求网页根目录下的documents的文件,返回状态码403
        return 403;
        }
    location ^~/images/ {        //表示请求网页根目录下的images的文件返回状态码404
        return 404;
        }
           }
隐藏nginx报错页面指定内容
1)隐藏报错nginx版本号
[root@localhost ~]# vim /usr/local/nginx/conf/nginx.conf
修改为报错页面后:
        location / {
            root   html;
            return 401;
        }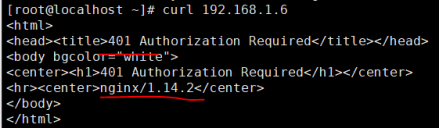
想要隐藏图中的nginx/1.14.2版本号
[root@localhost ~]# vim /usr/local/nginx/conf/nginx.conf
在http全局模块写下入如下内容:
http {
    include       mime.types;
    default_type  application/octet-stream;
server_tokens off;
重启服务,再次访问查看

2)隐藏版本号相对来说还不是最安全,可以调整到改变nginx
[root@localhost ~]# cd /usr/src/nginx-1.14.2/src/core/
[root@localhost core]# vim nginx.h
图中的红线部分均可修改为其他字样
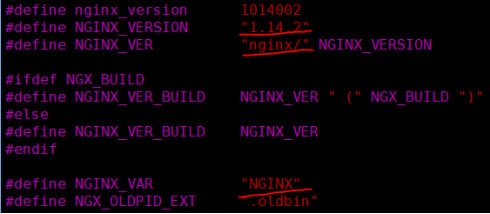
#define NGINX_VERSION      "1.14.2"        //版本号
#define NGINX_VER          "GUESS" NGINX_VERSION
#define NGINX_VAR          "GUESS"    //nginx请求成功的会提示的服务名
修改nginx页面头部信息
[root@localhost http]# vim ngx_http_header_filter_module.c         //nginx页面头部信息文件
修改
static u_char ngx_http_server_string[] = "Server: APACHE" CRLF;    //服务字符串,将NGINX改为APACHE来混淆
修改nginx报错响应信息
[root@localhost http]# vim ngx_http_special_response.c     //报错响应信息
修改图中两处
"<hr><center>" NGINX_VER "(http://www.baidu.com)</center>" CRLF    //报错后,返回地址
"<hr><center>GUEsS</center>" CRLF        //报错后,显示nginx 的地方改为GUESS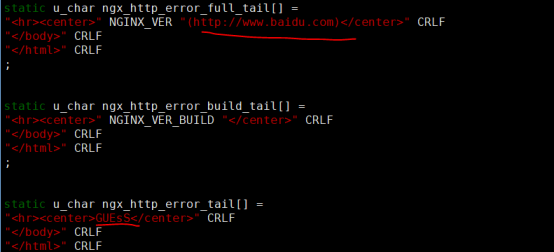
修改完之后需要重新编译nginx才会生效
[root@localhost nginx-1.14.2]# ./configure --prefix=/usr/local/nginx \
--user=nginx \
--with-http_stub_status_module \
--with-pcre \
--with-http_ssl_module && make && make install
重新停止,启动服务
[root@localhost ~]# systemctl stop nginx
[root@localhost ~]# systemctl start nginx
调整nginx运行的进程
[root@localhost ~]# vim /usr/local/nginx/conf/nginx.conf
worker_processes  1;        //工作时的进程数
在正常提供服务时设置和cpu核心数量相等的进程数
如果高负荷是设置为cpu核心数的二倍数量
[root@localhost ~]# grep processor /proc/cpuinfo | wc -l        //查看cpu核心数
worker_connections  1024;        //单个进程的并发最大连接数
最大工作连接数=工作的进程数*单个进程工作连接数量
[root@localhost ~]# ulimit -HSn 65535  //表示对于打开文件的软硬限制为65535(临时)
events {
    worker_connections  1024;
    worker_rlimit_nofile 65535;            //永久允许nginx服务最大的打开文件数量(允许用户访问量(理论))
}
[root@localhost ~]# vim /etc/security/limits.conf         //永久调整打开文件的软硬限制
调整nginx配置文件中的网络带宽,以及各种超时时间
[root@localhost ~]# vim /usr/local/nginx/conf/nginx.conf
    sendfile        on;        //开启文件高效传输模式
    #tcp_nopush     on;        //防止网络以及磁盘I.O阻塞(减少网络使用量)
tcp_nodelay     on;        //防止网络以及磁盘I.O阻塞(发送数据时,内核将多个包合成一个包进行发送,减少IO消耗)

在nginx中可以设置自动链接超时
1)将无用链接尽快超时,保证服务器资源高效使用
2)    当链接较多,及时断掉空闲链接,保护服务器资源高可用状态
keepalive_timeout  65;        //保持链接的超时时间
clien_header_timeout 30;        //设置读取客户机请求头部数据的超时时间
clent_body_timeout  30;        //设置读取客户机请求主体的超时时间
send_timeout  30;            //用于指定响应客户端的超时时间
client_max_body_size  1M;        //设置客户机请求主体的最大面积

压缩文件
优点:提升用户体验,发送给用户的数据小,打开网页速度更快
  节约网站带宽成本,减小流量损失
  可以选择压缩或者不压缩的内容
#gzip  on;        //开启压缩功能
gzip_min_length    1K //允许压缩的最小字节数
gzip_comp_level [1-9]    //设置压缩比,数值越大,压缩文件的速度越慢,反之越快,常用6
gzip_varry  on;        //可以让前端的缓存服务器经过gzip压缩页面
gzip_types  text/plain application/x-javascript test/css application/xml    //选择要压缩的文件类型
test/thml页面总是被压缩
博客内容遵循 署名-非商业性使用-相同方式共享 4.0 国际 (CC BY-NC-SA 4.0) 协议